Monday, June 11, 2018

HOW TO MAKE CANNABIS CAKES (SPACE CAKE)

You don’t need to live in Amsterdam to get delicious cannabis edibles, make them at home with this easy to follow recipe.

Your ingredients:

  • About 10 grams of cannabis bud, or the equivalent strength in either cuttings or hash.
  • 1 ¾ cups of flour
  • 1 cup of non-salted butter
  • 1 cup of granulated sugar
  • ¾ cup of milk
  • 2 eggs
  • 1 ¾ teaspoons of baking powder
  • ½ teaspoon of salt
  • You can add other things such as cocoa, chocolate chips, etc.

You will need:

  • grinder
  • A mixing bowl
  • Spatula or mixing spoon
  • A cake oven tin
  • Non-stick spray or lining paper
  • An oven
  • A microwave
  • A small bowl
  • A skewer
  • Optional: A wire rack

AND NOW YOU CAN START!

  1. Grind up all your cannabis until it’s very fine.
  2. Pre-heat your oven to 180 degrees Celsius.
  3. Put the butter in a bowl and place it in the microwave for 20 seconds. You want it half melted, nor runny, more gooey.
  4. Mix your freshly ground up cannabis into the butter.
  5. Add the sugar, flour, milk, cannabis butter, eggs, plus anything else you want to your mixing bowl. Mix everything together until you get a batter with a nice even consistency
  6. If the mix is too dry, add a splash of extra milk; if it is too wet then simply add some extra flour..
  7. Grease your cake tin with non-stick spray, or line it with non-stick baking paper.
  8. Carefully pour your cake batter into the tin, spreading it around so that it is evenly distributed.
  9. Place your tin in the oven and bake for 25 minutes.
  10. After 25 minutes, stab the centre of the cake with a skewer. If it comes out clean, it is read.
  11. Allow the cake to cool for about 20 minutes in the tin; then turn it upside down and take it out.
  12. Once cooled, decorate the cake with anything you want. You can even make cannabis icing sugar if you use cannabutter to make it.
  13. Enjoy!

Allow 45 min to 90 min digestion before it kicks in, and remember, don’t give this to anyone before telling them what is in it.
Happy Baking!

For more info visit: Visit our website for more Cannabis info


Wednesday, June 6, 2018

Growing Marijuana Outdoors in South Africa

Getting Ready for Spring Planting Season in SA

STEPS (When, How and some Tips)

I know you are all itching to start your next marijuana growing season but patience as they say, is a virtue, and when it comes to growing outdoor marijuana, it definitely is.

Growing season starts 1 September, Spring Day, so make sure you have everything you need ready by then. You should plant after winter when the temperature is starting to warm up and the days start becoming longer. It depends where in SA you live, in Cape Town you can start germinating your marijuana seeds towards the end of August.

Depending on the seed you will need 4 – 6/7 months before you can harvest. So yet again patience is the word.


STEP 1 - Choose your Seeds


Don't waste your time, minerals and nutrients etc. on seeds you find lying sound or at the bottom of your bankie. You can easily purchase seeds online. Take into consideration through that you will need to wait for delivery so don't take too long before you order.
There are many strains to choose from on websites such as:

https://www.cannabisseeds.co.za/

https://www.dope-seeds.com/blog/buy-cannabis-seeds-south-africa/

https://www.everyonedoesit.com/

https://www.cannabis-seeds-bank.co.uk/

https://www.greenhouseseeds.nl/

https://www.sanniesshop.com/?sl=EN

https://www.dinafem.org/en/

https://www.bonzaseeds.com/

https://sensiseeds.com/en/cannabis-seeds


STEP 2 - Gathering your materials


Pots
Depending on the amount of seeds you would like to grow, you will need a 5 litre or 10 litre pot for each one, material pots are the best option and are re-usable as well. But you can also use plastic pots, no ceramic pots!


Soil
Combine turf soil, worm castings or bonemeal and perilite.

Nutrients
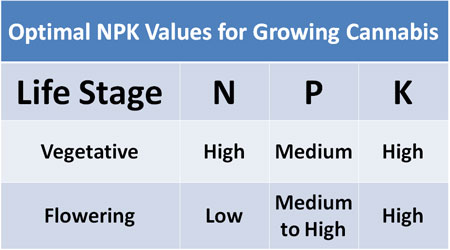
There are many different nutrients but as long as you make sure you give your plants the right amounts of nutrients at the right time you will be fine. For the best results, your marijuana plants will need the following nutrient ratios…


Most nutrient bottles display 3 numbers,N-P-K, this stands for Nitrogen, Phosphorus and Potassium

The main thing is to avoid giving oo much Nitrogen during the flowering stage, as it can discourage bud development and give the buds an unpleasant taste. This is the reason a general purpose plant nutrient is not a good choice in the flowering stage.


STEP 3 - Germinating seeds (End of August)


Use the seeds you ordered online, place them in water overnight in a dark, dry place (kitchen cupboard works well). The next morning place them in cotton wool, make sure to wet them properly with water in the cotton wool and cover them for 24 – 48 hours in the same dark, dry place you had them before (you can simply use 2 side plates on top of each other for this part).

As soon as they sprout roots place them 1cm from the top of the soil in your pots and cover them with a bit of soil (not too much).

There you go... ready for Spring.

Happy Planting!


For more info visit: How to grow weed

Saturday, June 2, 2018

Indoor Grow Lights

When you have decided to grow weed at home you will need to decide if you are growing indoors or outdoors.

With outdoor growing, you won't need a grow light and tent and will be a lot cheaper.

But indoors you can grow some serious bud if you look after all your plant's needs during the cannabis plants life.

Choosing a Grow Light

There are many different kinds of grow lights available to choose from. Ranging from HPS, LED and HID. All the lights have their pros and cons so when choosing a light select carefully. Below is a list of some popular grow lights used by many people.

Mars Hydro 1600 watt
Mars Hydro 400 watt
Mars Hydro Reflector 192
Mars Hydro Reflector 48